
Automate Database Builds Part One: Extract DacPacs Using PowerShell Via sqlpackage.exe
This topic has several parts -
Automate Database Builds Part One: Extract DacPacs Using PowerShell Via sqlpackage.exe
Automate Database Builds Part Two: Extract Database Structure for Visual Studio Solution
Automate Database Builds Part Three: Create A Database Publish Profile
When we release new versions of our software the databases we deploy to sit in a different domain from our development servers. Not long ago we could connect using Datadude and extract the schema of our database, compare to our solution, and generate a deployment script. Now, with SQL Server 2012, we use SQL Server Data Tools (SSDT). We’ve had a few challenges with SSDT as there have been a flurry of updates, which seem incompatible with certain versions of our solutions, but it seems to be more stable after December’s update for VS 20120 and VS 2012.
Because we are not supposed to have direct connectivity to our production databases from our development environment (where all our build servers and source control reside), we now extract the dacpacs and create the scripts by comparing to the dacpacs, which after extracted we add to source control.
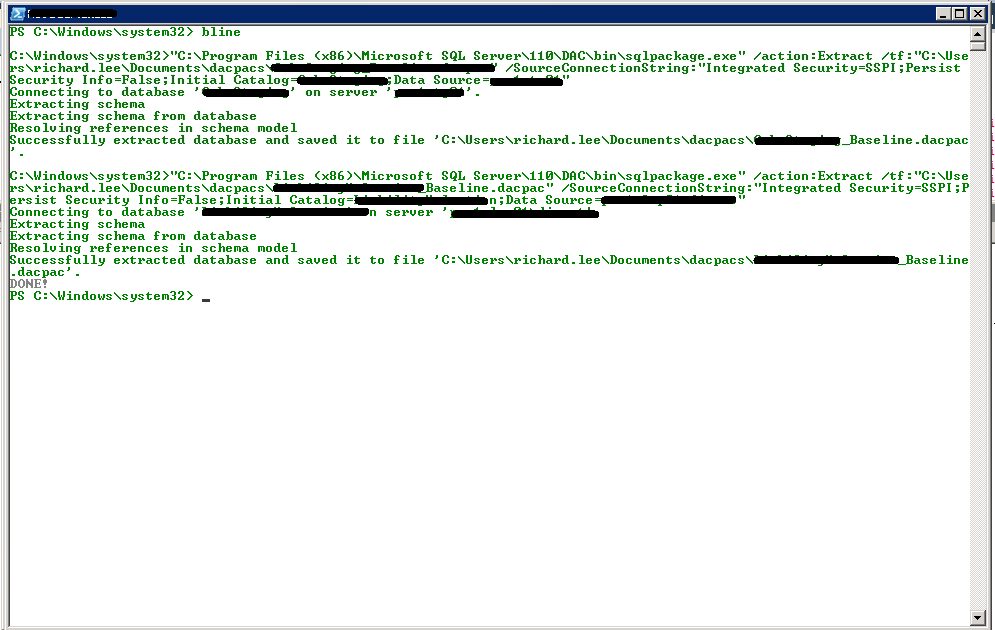
We don’t have too many databases to deploy at any one time, but it’s still a tedious process extracting all the dacpacs. Fortunately you can run this from the command line using sqlpackage.exe, which means you can create a bat file. And this in turn means you can create a PowerShell module that will run the bat file. This module can have multiple functions in it, which in turn can have aliases, so that the whole process can be boiled down into as little as two or three keystrokes on the page. In this case there will be just one function, which will be to extract the dacpacs and place them in a drop location.
First, the bat file should contain one line of this for each database you want to extract:
text"C:\Program Files (x86)\Microsoft SQL Server\110\DAC\bin\sqlpackage.exe" /action:Extract /tf:"C:\Users\richard.lee\Documents\dacpacs\db_Baseline.dacpac" /SourceConnectionString:"Integrated Security=SSPI;Persist Security Info=False;Initial Catalog=DbName;Data Source=$SqlServerInstance"
And now we create a PowerShell Module. You can use this Manifest Module below. If you want to share the module amongst all users of the server then you need to create your module in this location:%windir%\System32\WindowsPowerShell\v1.0\Modules. You may even find a few other modules there already from Microsoft. Save the module with the psd1 extension
# Module manifest for module 'DacPac'
#
# Generated by: Richard Lee
#
# Generated on: 03/08/2012
#

@{

# Modules to import as nested modules of the module specified in ModuleToProcess
NestedModules = @('GetDacPac.psm1')

# Version number of this module.
ModuleVersion = '1.0'

# ID used to uniquely identify this module
GUID = 'D3750F0D-BF98-4BB9-9830-264227612CAB'

# Author of this module
Author = 'Richard Lee'

# Company or vendor of this module
CompanyName = 'PoryHydra'

# Copyright statement for this module
Copyright = 'PoryHydra 2012'

# Description of the functionality provided by this module
Description = 'Module to Create DacPac'

# Minimum version of the Windows PowerShell engine required by this module
PowerShellVersion = ''

# Name of the Windows PowerShell host required by this module
PowerShellHostName = ''

# Minimum version of the Windows PowerShell host required by this module
PowerShellHostVersion = ''

# Minimum version of the .NET Framework required by this module
DotNetFrameworkVersion = ''

# Minimum version of the common language runtime (CLR) required by this module
CLRVersion = ''

# Processor architecture (None, X86, Amd64, IA64) required by this module
ProcessorArchitecture = ''

# Modules that must be imported into the global environment prior to importing this module
RequiredModules = @()

# Script files (.ps1) that are run in the caller's environment prior to importing this module
ScriptsToProcess = @()

# Format files (.ps1xml) to be loaded when importing this module
FormatsToProcess = @()

# Functions to export from this module
FunctionsToExport = '*'

# Cmdlets to export from this module
CmdletsToExport = '*'

# Variables to export from this module
VariablesToExport = '*'

# Aliases to export from this module
AliasesToExport = '*'

# List of all modules packaged with this module
ModuleList = @()

# List of all files packaged with this module
FileList = @()

# Private data to pass to the module specified in ModuleToProcess
PrivateData = ''

}
You’ll notice that there is a nested module references in this manifest module. This is a reference to a file that contains the function we run in order to kick off the bat file. The ‘GetDacPac.psm1’ should be in the same file location as the, however the extension should be psm1.
function Get-DacPac
{
C:\Windows\System32\WindowsPowerShell\v1.0\Modules\DacPac\dacpac.bat
write-host "DONE!" -foregroundcolor darkgray -backgroundcolor white
}
New-Alias bline Get-DacPac
Export-ModuleMember -alias * -function Get-DacPac
At the bottom of the file outside of the function there is a cmdlet that reads
powershell New-Alias bline Get-DacPac
typically if we wanted to run this function we’d have to write get-dacpac, but seeing as time is short this alias allows us to type “bline”, and the function is called regardless.
 It’s a pretty straightforward module, and doesn’t allow for much by way of error handling, and the drop location is hard baked into the bat file, so by no means perfect, but is does the job I need it to do without spending more time writing up a pretty function. That’s for the next guy (kidding)! If you want to expand this, you could parametrize the drop location, and add switches to group the databases together if you only need a subset of the dacpacs.