
RECOVERY vs NORECOVERY vs STANDBY
When restoring a database you can specify one of three recovery options; RECOVERY, NORECOVERY and STANDBY. Today I’m going to touch briefly on the RECOVERY and NORECOVERY options before delving deeper into the STANDBY mode as it has a few features that separate it from the either two options that are worth explaining.
RECOVERY
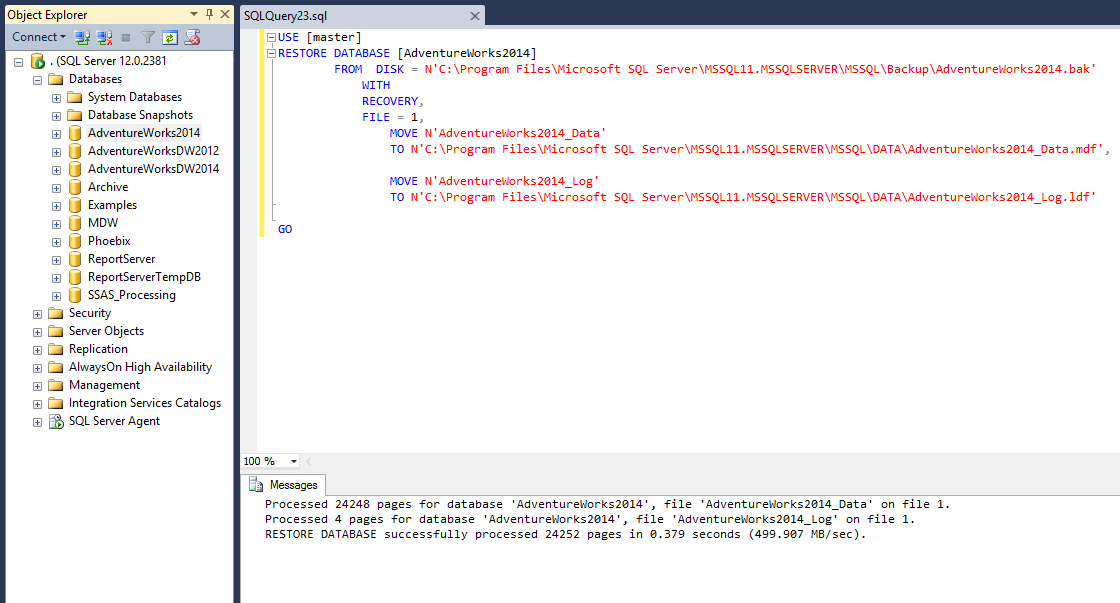
RECOVERY is The default option. This indicates that the restore is complete and that once RESTORE is complete it is fully available. No further backups can be applied to the database as the db engine cannot guarantee consistency between what has changed in the fully recovered database and if the further backup files can be restored successfully.
Below is a screenshot from restoring the database with the “RECOVERY” option explicitly called. The database itself is restored and readily available to be queried:
NORECOVERY
The database is in a state of RESTORING even after this RESTORE is complete as there are further RESTORE statements expected (eg t-log or differential). I’m just going to specify NORECOVERY here rather than restore from a full backup then a log backup as I do this in a further demo below. When the restore is complete, the database cannot be read from or written to.

STANDBY
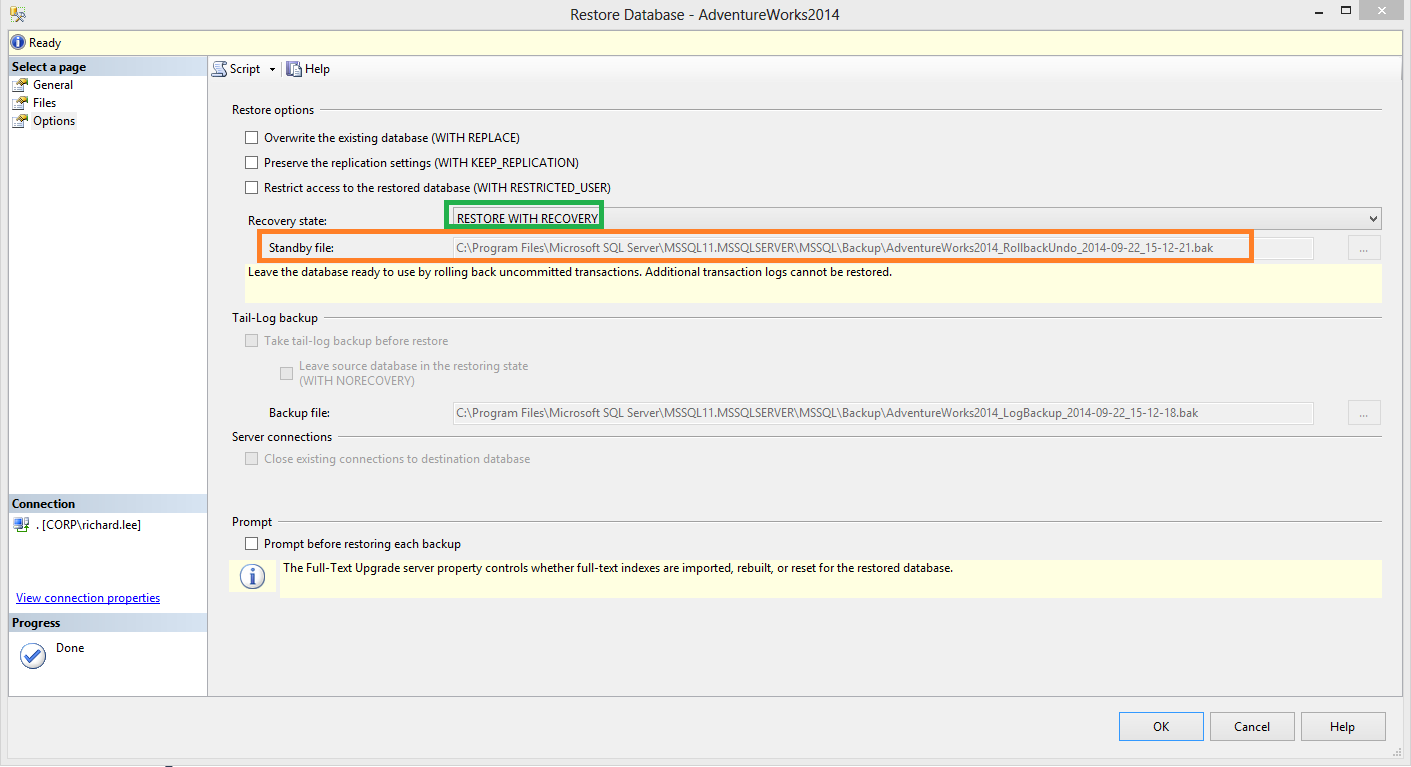
Similar to NORECOVERY except that the database will accept read only connections. To do this any uncommitted transactions in the backup will be rolled back and stored in a transaction undo file (tuf.) Whilst users are running queries against the database no further restores can continue until all queries are complete (though this is not the case with log shipping.) When the next restore occurs, those uncommitted transactions in the tuf file will be rolled forward and the next log is restored.
Tuf files can grow very large where there is a large number of uncommitted transactions, especially as the tuf file stores the uncommitted pages as opposed to just the uncommitted rows. This can greatly increase the restore time.
Let’s see STANDBY in action. With AdventureWorks 2014 restored, we’ll set the recovery model to FULL, create a new table, insert some data, then back the database up with a FULL backup. Then we’ll insert an extra 10 rows and backup those changes with a LOG backup. With our two backups in place, we’ll drop the database.
USE master
GO
ALTER DATABASE adventureworks2014 SET RECOVERY FULL
GO

USE AdventureWorks2014
GO
--create new table
select top 0 * into [Person].[PersonPhone_v2] from [Person].[PersonPhone]

--insert 5 rows from old table
insert into [Person].[PersonPhone_v2]
select top 5 * from [Person].[PersonPhone]

--take a full backup. REMEMBER: the count in the new table will be 5
BACKUP DATABASE [AdventureWorks2014]
TO DISK = N'C:\Program Files\Microsoft SQL Server\MSSQL11.MSSQLSERVER\MSSQL\Backup\AV_2.bak'
WITH NOFORMAT, NOINIT,
NAME = N'AdventureWorks2014-Full Database Backup', SKIP, NOREWIND, NOUNLOAD, STATS = 10
GO

--insert another 10 rows
insert into [Person].[PersonPhone_v2]
select top 10 * from [Person].[PersonPhone]

--backup just the log. tius will include the 10 other rows
BACKUP LOG [AdventureWorks2014]
TO DISK = N'C:\Program Files\Microsoft SQL Server\MSSQL11.MSSQLSERVER\MSSQL\Backup\AdventureWorks2014_log_1.bak'
WITH NOFORMAT, NOINIT,
NAME = N'AdventureWorks2014-Full Database Backup',
SKIP, NOREWIND, NOUNLOAD, STATS = 10
GO

--drop the database
EXEC msdb.dbo.sp_delete_database_backuphistory @database_name = N'AdventureWorks2014'
GO
USE [master]
GO

DROP DATABASE [AdventureWorks2014]
GO
Ok, now we’ll restore the database.
--restore the full backup that had the new table and 5 extra rows
USE [master]
RESTORE DATABASE [AdventureWorks2014]
FROM DISK = N'C:\Program Files\Microsoft SQL Server\MSSQL11.MSSQLSERVER\MSSQL\Backup\AV_2.bak'
WITH FILE = 1,
STANDBY = N'C:\Program Files\Microsoft SQL Server\MSSQL11.MSSQLSERVER\MSSQL\Backup\AdventureWorks2014_RollbackUndo_2014-09-22_14-39-15.bak',
NOUNLOAD, STATS = 5

GO
In the Object Explorer window the database will be greyed out.

However, we can still query it. Let’s confirm that there are 5 rows in the new table.

If we try to insert the data we will get an error message.

And finally, if we begin a transaction and run a select, because we have a lock on the tables then we cannot drop the database.

When I commit the transaction and run the drop again, the database will drop. But what I want to do now is restore the log onto this database . You’ll notice that there is a standby file that SQL is using to compare any uncommitted transaction taken during the backup. It’s worth noting that despite the fact that we are restoring with RECOVERY, the database will still be in read only mode once the log is added.
Once the database is online, we can check that the log was restored by running a count against the new table. It should return 15.
To restore the database so that it is in read/write mode you need to restore the database with the RECOVERY statement.
use master
go
restore database adventureworks2014 with recovery
If any further logs were taken, because we restored with RECOVERY, we would not be able to apply those logs. In order to have restored those logs, we would have needed to specify NO RECOVERY.
I’ve never actually had to use the STANDBY mode before, but it gives a flexibility to the recovery method and allows the database to be online for querying at least whilst restoring.